1. Background knowledge
With the advent of the era of Industry 4.0, machine vision systems are widely used in all walks of life and have the advantage of being irreplaceable by humans. In the electronic field, due to its small components, design diversity, and large quantity, visual inspection systems are used in this field to replace manual inspection.
When the traditional visual inspection system (2D camera) is inspecting, a shooting camera can only shoot from one angle. When the shooting of one angle is completed, the workpiece needs to be transferred to the next inspection station by mechanical drive, and the workpiece or the shooting camera An angle change is required to meet the detection requirements. These visual inspection systems take up a lot of space, and the workpiece also has the possibility of secondary damage during the transfer process.
Laptops are a must-have electronic device for today's office workers. Traditionally, the appearance inspection of laptops relies on manual inspection. Due to the large size of the computer shell, the manual inspection efficiency is low, the intensity is large, and the error is large. There is an urgent need for 3D visual inspection.
2. Laptop shell detection scheme
Nextvision's all-in-one 3D industrial camera (LVM-2 050 ) has the characteristics of wide field of view and large depth of field. With the random debugging software, it can scan all the coordinate data of the notebook shell very comprehensively , and pass the 3D point cloud data. Processing, scanning and testing of the notebook shell , including the overall flatness and height measurement of the product, whether there are defects , changing from manual testing to fully automatic equipment testing, improving product quality control and increasing end customer satisfaction .
2.1 Adopt camera
All-in-one 3D line laser camera LVM-2 050 .
The LVM-2 050 has 2048 actual physical contour points in the X direction . The acquisition speed under full-frame is 340 frames per second , with a wide field of view and a high depth of field of up to 337mm, which is suitable for flatness measurement of laptop case detection .
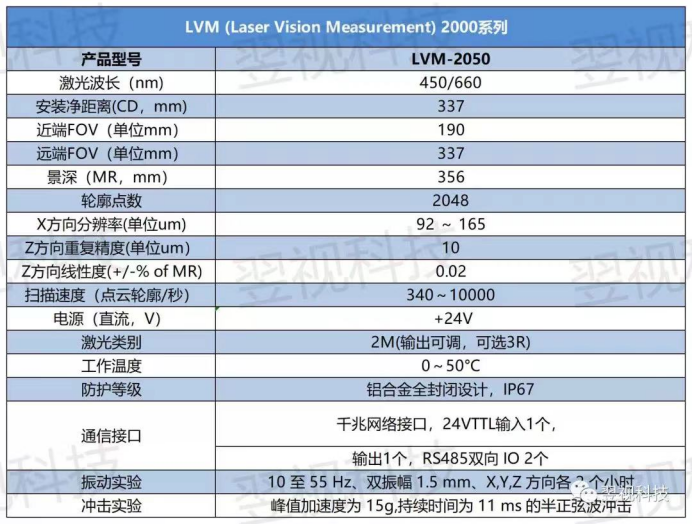
(LVM-2 050 parameters)
2.2 Detection method
It is beneficial to 3D point cloud data, fitting the reference plane, and measuring the overall flatness and height of the product.
2.3 Detection effect
The distal FOV is larger than the housing width, and the entire workpiece can be scanned at one time;
High precision requirements, the repeatability of the testing equipment is within ± 10 μm ;
- speed detection, frame rate up to 340 fps at full frame.
The detection and sampling effect is as follows:
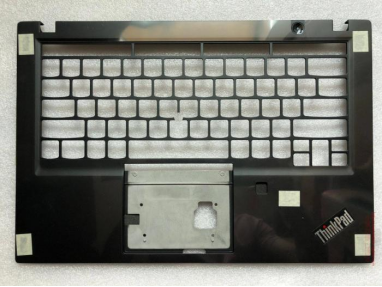 parts
parts
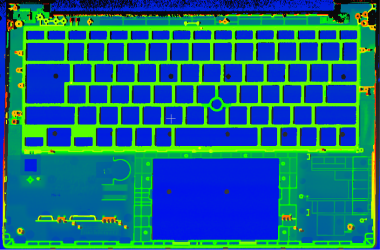
point cloud
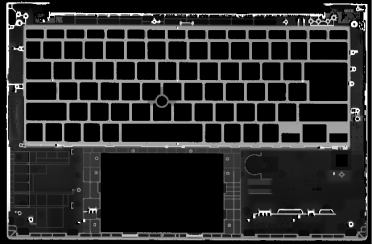
grayscale grayscale
3. Application case
Laptop flatness , breakage , missing parts, etc. detection :
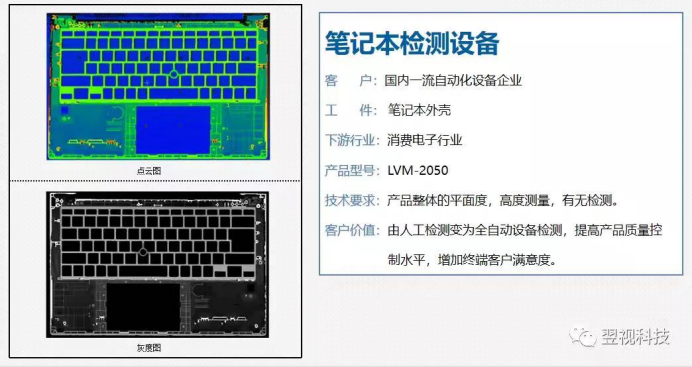
needs and solutions
■Measurement objects: detection of notebook flatness, breakage, missing parts, etc.;
■Technical requirements: Z±0.05MM, FOV: 260MM;
■Beat requirements: scan the product within 3S, (product length is 300MM), the frame rate is about 2K, the LVM-2050 camera can reach up to 10K FPS, which meets the rhythm requirements;
■Measurement plan: A single LVM-2050 camera scans in the Y direction, and sets reasonable thresholds for flatness, difference and position through the Capture image algorithm platform, within the threshold range is OK, and exceeds the threshold NG;
■Mechanism: high-precision servo motion control;
■Technical highlights: 1.LVM-2050 camera satisfies the flatness, screw height and the presence or absence of plastic parts in most notebook projects.
■Customer value: Change from manual testing to fully automatic testing equipment, improve product quality control and increase end customer satisfaction.
about us About us
Founded in 2017, Yishi Technology Co., Ltd. is a high-tech enterprise integrating 3D machine vision product design, research and development, production, sales and service. Yishi Technology is located in Ningbo (operation headquarters) and Shanghai (R&D center), and has set up sales and technical support centers in East China (Suzhou) and South China (Shenzhen). The company's core team brings together doctors from famous universities, executives from famous enterprises and technical cores. Focusing on the research and development of machine vision products, the development of underlying algorithms and hardware implementation, it has a full set of software and hardware technologies with independent intellectual property rights, and is committed to becoming a world-class visual sensor company. The precision and performance of the company's high-end products have already surpassed those of the same foreign products, enabling import substitution. The company's products have been widely used in consumer electronics manufacturing, new energy manufacturing, automobile manufacturing, sheet metal processing and other fields. In a wide range of landing applications, it saves customers more than half of the cost on average, and is highly praised.
contact us Contact us
headquarters
15th Floor, Building 1, Tsinghua Science and Technology Park, No. 119 Zicheng Road, Yinzhou District, Ningbo City
R & D Center
Room B2, 8th Floor, Block B, Kehai Building, No. 800 Naxian Road, Zhangjiang Science City, Pudong New Area, Shanghai
Subsidiary
Room 1705-1706, 17th Floor, East Building, Building A, Fanhua Center, Xiangcheng District, Suzhou
Shenzhen Office
Room 1001, 10th Floor, Yonghui International Business Building, Baoan District, Shenzhen
contact number:
0574-55337778
Company official website:
www.nextvision-tech.com
Company email:
info@nextvision-tech.com
 2022/02/16
